Spring is finally here. The days are getting longer, the farmers’ markets are starting to fill with fresh greens, and there’s a lightness in the air that makes you want to cook something bright, fresh, and satisfying. This Oven-Baked Spring Pea Shell Pasta is exactly that dish.
Tender pasta shells, sweet green peas, a creamy Parmesan broth, and a touch of black pepper — all baked together in one dish until the pasta is perfectly tender and the sauce has thickened into a velvety coating. It’s simple, elegant, and absolutely delicious.
The magic of this recipe is in the method. You don’t need to boil the pasta first. The dry shells go straight into the baking dish, where they absorb the creamy broth as they bake, becoming perfectly al dente while infusing with all that cheesy, savory flavor. The frozen peas go in raw and thaw during baking, staying bright green and sweet. And the Parmesan melts into the sauce, creating a rich, creamy finish.
This is the kind of dish that works for a quick weeknight dinner, a meatless Monday, or even a light spring supper with a side salad and a glass of white wine. It’s vegetarian (if you use vegetable broth), easily adaptable, and guaranteed to please.
Why You’ll Love This Recipe
-
No boiling pasta – The shells cook right in the baking dish.
-
Bright, fresh spring flavors– Sweet peas, creamy Parmesan, and a touch of black pepper.
-
Creamy, comforting, and satisfying – A complete meal in one dish.
-
Vegetarian adaptable – Use vegetable broth for a meatless version.
-
Ready in about an hour – Mostly hands-off oven time.
-
Great for weeknights or entertaining – Simple enough for a Tuesday, elegant enough for guests.
-
Kid-approved – Pasta, cheese, and peas are a winning combination.
Ingredients
-
Dry medium pasta shells – 8 ounces
-
Frozen green peas (do not thaw) – 1½ cups
-
Low-sodium vegetable or chicken broth – 2 cups
-
Heavy cream – 1 cup
-
Finely grated Parmesan cheese – 1 cup, plus a little extra for serving
-
Kosher salt – 1 teaspoon (or to taste)
-
Freshly ground black pepper – ½ teaspoon
-
Olive oil or softened butter (for greasing the dish) – 1 tablespoon (optional)
Ingredient Notes
What kind of pasta shells?Medium pasta shells (conchiglie) are ideal because their shape holds the creamy sauce beautifully. Small shells work too. You can also use other short pasta shapes like cavatappi, rotini, or penne — adjust cooking time slightly if needed.
Why frozen peas? Frozen peas are perfect for this recipe. They’re picked and frozen at peak sweetness, so they taste bright and fresh year-round. Do not thaw them first — they’ll thaw and cook perfectly in the oven. Fresh peas can also be used (blanch them first for 1 minute).
What kind of broth? Vegetable broth keeps the dish vegetarian and adds a light, savory note. Chicken broth adds a richer, deeper flavor. Both work beautifully. Use low-sodium so you can control the salt level.
What kind of heavy cream?Heavy cream (also called heavy whipping cream) creates the richest, creamiest sauce. Half-and-half will work but will result in a thinner, less creamy sauce. Do not use milk — it won’t create the same velvety texture.
What kind of Parmesan? Finely grated Parmesan melts best. Avoid pre-shredded Parmesan (it contains anti-caking agents that prevent smooth melting). Grate it yourself from a block for the best results. Parmesan adds saltiness, so taste before adding extra salt.
Why do I need to grease the dish? Greasing prevents the pasta from sticking to the bottom of the dish. It’s not strictly necessary if you’re using a non-stick ceramic dish, but it’s a good insurance policy.
Step-by-Step Instructions
Step 1: Preheat and Prepare
Preheat your oven to 375°F (190°C) .
Lightly grease a medium ceramic baking dish (about 2-quart capacity) with olive oil or butter to help prevent sticking and make cleanup easier.
Step 2: Layer the Pasta and Peas
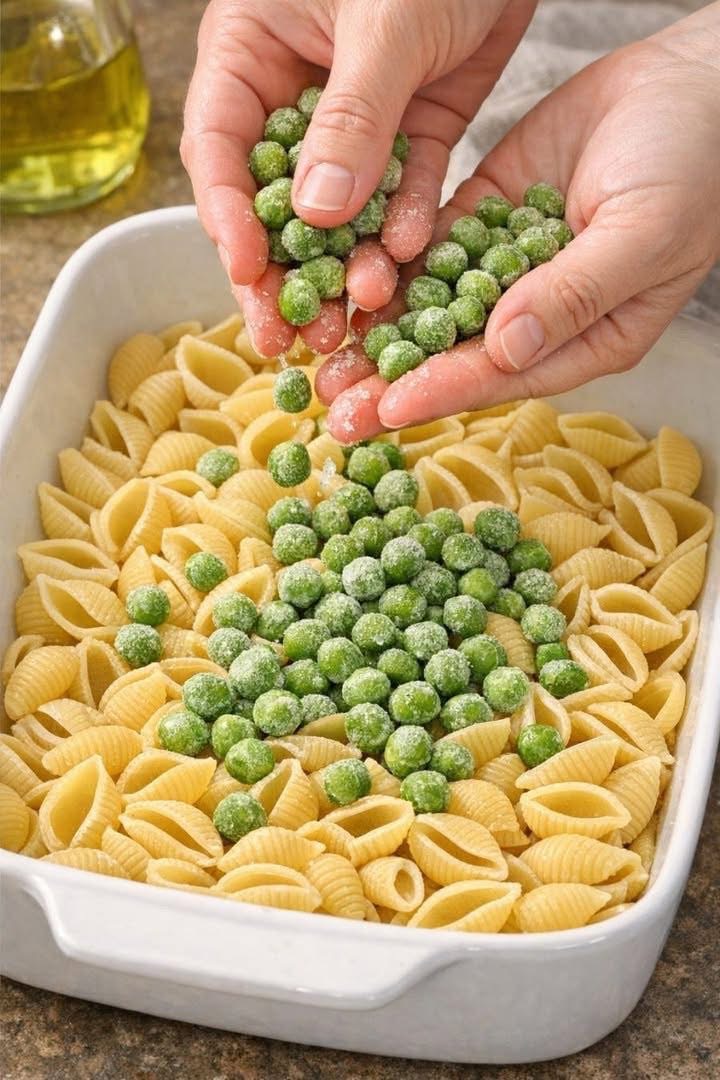
Pour the 8 ounces of dry pasta shells into the ceramic baking dish and spread them into an even layer. The shells should mostly cover the bottom of the dish in a single, slightly overlapping layer.
Scatter the 1½ cups of frozen green peasevenly over the dry pasta shells. This layering helps the peas steam and stay tender while the pasta absorbs the liquid.
Do not thaw the peas — they go in frozen.
Step 3: Make the Creamy Broth
In a mixing bowl or large measuring cup, whisk together:
-
2 cups low-sodium vegetable or chicken broth
-
1 cup heavy cream
-
1 cup finely grated Parmesan cheese
-
1 teaspoon kosher salt
-
½ teaspoon freshly ground black pepper
Whisk until the cheese is mostly dissolved and the mixture looks smooth. Taste the liquid and adjust the seasoning if needed, keeping in mind the Parmesan will add saltiness as it bakes.
Step 4: Pour the Liquid Over the Pasta
Slowly pour the cream-and-broth mixture over the pasta and peas in the ceramic baking dish, making sure the liquid seeps down through the shells.
Gently nudge any exposed pasta down so most of it is at least partially submerged. A few pieces peeking out are fine and will brown slightly, adding nice texture.
Step 5: Cover and Bake
Cover the baking dish tightly with foil to trap in steam, which helps the shells cook evenly.
Place the dish on the middle rack of the preheated oven.
Bake, covered, for 30 minutes.
Step 6: Uncover and Finish Baking
Carefully remove the foil (watch for steam). Check the pasta by stirring gently from the bottom. The shells should be mostly tender but may still have a slight bite, and the sauce will look loose at this stage.
Return the dish to the oven, uncovered, and bake for another 10 to 15 minutes. Stir once halfway through if you like.
The dish is ready when:
-
The pasta is fully tender
-
The sauce has thickened into a creamy coating
-
The top has a few golden spots
-
The peas are bright green
Step 7: Rest and Serve
Remove the dish from the oven and let the pasta rest for about 5 minutes. The sauce will continue to thicken slightly as it cools. If it looks too thick, you can loosen it with a splash of warm broth or hot water and stir gently.
Taste and adjust seasoning with a bit more salt and pepper if needed.
Sprinkle with a little extra grated Parmesan before serving, and bring the dish straight to the table so everyone can scoop out their own portion.
Variations & Tips
Add Protein
-
Cooked shredded chicken – Add 1 cup along with the peas
-
Cooked bacon or pancetta – Sprinkle ½ cup of crumbled bacon over the top before baking
-
Cooked Italian sausage – Crumble and add 1 cup
-
Shrimp – Add raw shrimp during the last 10 minutes of baking
Add Vegetables
-
Asparagus – Add 1 cup of chopped asparagus (1-inch pieces) along with the peas
-
Spinach – Stir in 2 cups of fresh spinach during the last 5 minutes of baking
-
Mushrooms – Sauté 1 cup of sliced mushrooms and add along with the peas
-
Zucchini – Add 1 cup of diced zucchini along with the peas
Make It Lighter
-
Use half-and-half instead of heavy cream
-
Use reduced-fat Parmesan(though full-fat melts better)
-
Use whole wheat pasta shells for extra fiber
Make It Dairy-Free
-
Use full-fat coconut milkinstead of heavy cream (adds a slight coconut flavor)
-
Use dairy-free Parmesan substitute or nutritional yeast
-
Use vegetable broth (already dairy-free)
Make It Gluten-Free
Use gluten-free pasta shells. Check the cooking time — gluten-free pasta may cook faster, so check at the lower end of the range.
Add Fresh Herbs
Stir in 2 tablespoons of fresh parsley, basil, or chives at the end for a bright, fresh finish.
Add Lemon
Add 1 teaspoon of lemon zest to the cream mixture, or squeeze fresh lemon juice over the finished dish. Lemon brightens the peas and balances the richness.
Add Garlic
Add 2–3 cloves of minced fresh garlic to the cream mixture. Garlic and peas are a classic pairing.
Storage & Reheating
Refrigerator: Store leftovers in an airtight container for up to 4 days. The sauce will thicken as it cools — that’s normal.
Reheating:
-
Microwave: 1–2 minutes per serving. Add a splash of milk or broth if the sauce is too thick.
-
Oven: 350°F for 10–15 minutes, covered with foil to prevent drying out.
-
Skillet: Warm over medium-low heat, adding a splash of broth or milk to loosen the sauce.
Freezing: Cream-based sauces can separate when frozen. If you plan to freeze this dish, consider freezing before adding the cream (or expect some texture changes). If freezing the finished dish, thaw overnight in the refrigerator and reheat gently, stirring well to re-emulsify the sauce.